Keeping it Real: baby
Showing posts with label baby. Show all posts

Friday, August 20, 2021

DIY baby meal gift set

Remember the tutorial for a lined flat zipper pouch I posted here a couple of days ago? As I said back then, I made that specific pouch to be part of a set - in this case, a gift set for a baby boy. 


DIY baby meal gift set


The pouch is to be used as storage for the cutlery, and it's paired with a matching bib. 

Tuesday, October 8, 2019

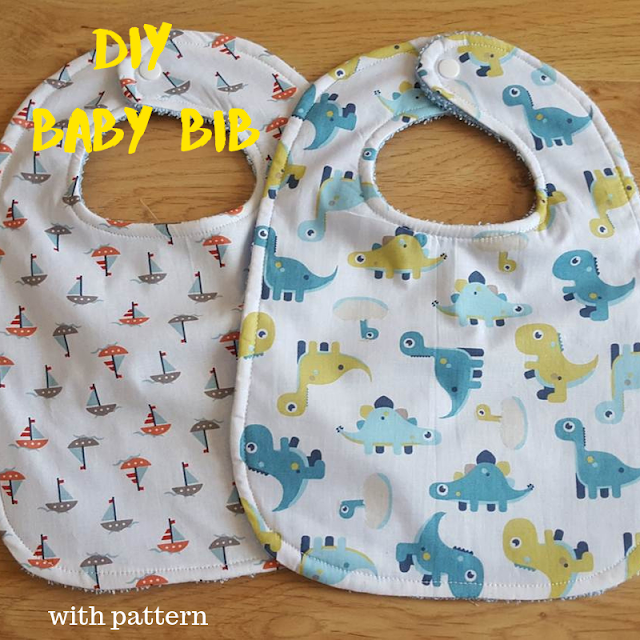
DIY large towel backed baby bib - with free pattern

I've officially started making Christmas gifts! And the first one is for a baby cousin, who will be about 4 months old around Christmas, so bibs were a natural choice.

 
DIY large towel backed baby bib - with pattern


I've made lots of bibs in the past, using my baby bib pattern but those bibs were mostly for girls, all round and dainty (check here for the version of the bib with a pocket). This time, as I was making bibs for a boy soon starting his first solid foods, I wanted the bibs to be larger. So what did I do? I drafted a new pattern, of course!

Monday, August 12, 2019

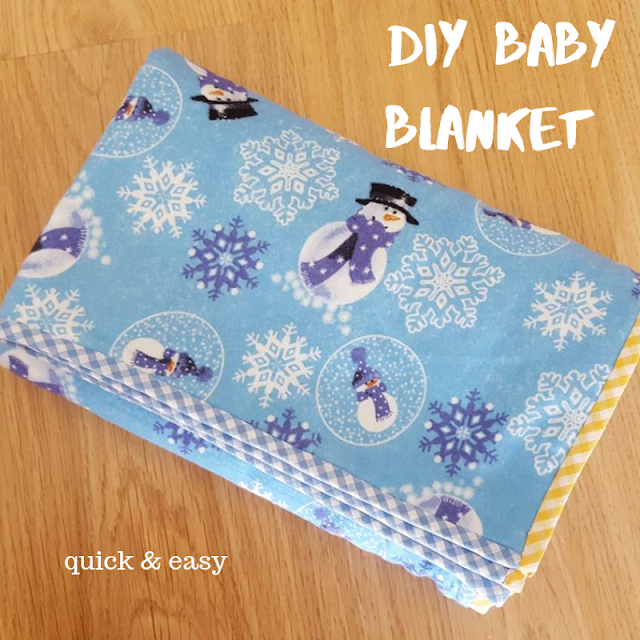
DIY Baby Blanket

Hello, and welcome to another week! Today I'm going to show you how to make a cute baby blanket. 

DIY Baby Blanket


I made this last weekend for a new baby boy cousin and even with having to sew bias tape all around, I still managed to finish it very quickly.


Monday, November 5, 2018

DIY Bunny Softies - with pattern

Hello, and welcome. Today I'm sharing two sweet bunny softies. I made them a couple of months ago as a gift for my cousin's baby girl and now I have finally finished drafting the pattern and putting together a tutorial.

DIY Bunny Softies - with pattern


They are really very easy to make. All you need is some cute fabric and a little bit of time, and you can create a lovely homemade gift. 

DIY Bunny Softies - with pattern


Thursday, February 1, 2018

Cross Stitch Baby Gift Set

Today I intended to share another installment of the You-Can-Do-It-Yourself series, but I had a very busy day yesterday and I just didn't have time to set it up. So instead I'm going to show you a cross stitched baby gift set I finished last weekend.

Cross Stitch Baby Gift Set


It's very similar to the one I made last year, but this time for a girl instead of a boy...

Cross Stitch Baby Gift Set


Both the bib and the little blanket were store bought, which may be a bit more expensive but always saves a lot of time. I just added the cross-stitch motives.

Cross Stitch Baby Gift Set

Cross Stitch Baby Gift Set


Inspiration for the cross stitch came from this Pinterest pin, though as usual I changed the pattern a lot before deciding on the final version.

 
Cross Stitch Baby Gift Set


I love cross stitching and I haven't done a lot of it lately, so making this was a real pleasure. In addition, it was a quick project and makes a lovely baby gift for the mother to be.

Cross Stitch Baby Gift Set


Happy Thursday, 

keeping it real, craft blog


Tuesday, February 7, 2017

cross stitch custom baby gift

When it comes to gifts, I always think homemade is the best route to follow. So I'm back here today to show you a custom baby gift I finished a couple of weekends ago for a sweet baby boy due any day now. 

cross stitch custom baby gift


Both the bib and the little blanket were store bought, which saved me a ton of time, so I just needed to add the cross-stitch. 

cross stitch custom baby gift

Inspiration for the vehicles came from this Pinterest pin, though I changed colors to create a uniform color scheme. 

cross stitch custom baby gift

cross stitch custom baby gift

cross stitch custom baby gift
 
The letters were designed by me, but you can find lots of inspiration for cross-stitch alphabets here

cross stitch custom baby gift

cross stitch custom baby gift

All in all, it was a quick project, it makes a lovely baby gift for a mother to be and I'm very happy with the result. 

cross stitch custom baby gift

cross stitch custom baby gift

Happy Tuesday, 

keeping it real, craft blog

Tuesday, November 22, 2016

DIY baby placemat - with tutorial

So, yesterday I shared a tutorial on how to make a travel meal set for babies and toddlers. I made it as a Christmas gift for my cousin's baby girl, who's turning one next January. The full set includes a pouch for the cutlery, a placemat and a baby bib. Today I will be sharing a quick tutorial on how to easily make a custom placemat. 


The placemat I made is sized 29 x 24 cm, because I sized it for a baby, and besides I wanted it to fit in the pocket of the travel meal set pouch:

DIY baby placemat - with tutorial

But if you follow the tutorial and just adjust the measurements you can make placemats any size. 

Monday, November 21, 2016

DIY baby travel meal set - with tutorial

I'm trying to get my Christmas sewing done in advance this year, and this weekend I finished the travel meal set for my cousin's baby girl. 

DIY baby travel meal set - with tutorial

The set includes a little pouch with pockets for the baby cutlery, a place mat and a matching bib:

DIY baby travel meal set - with tutorial

Today I'll show you how to make the pouch and the placemat, and over the next few days I will post tutorials for the bib and the placemat. 

The pouch is actually easier to make than it is to explain the process here. Whenever possible I added images, which should be self-explanatory, but if you want to make one and still have questions, feel free to e-mail me or leave a comment and I will try to help you to the best of my abilities. 

To make the pouch you will need:
  • the cutlery you will be using. I bought a set to add to the gift, but if you already have it, you'll just need it for measurements
  • fabric for the pouch. Exact measurements will depend on the size of your cutlery, so read on to get a better idea
  • batting
  • two pieces of matching ribbon
  • material for embellishment (optional). I used fabric yo-yos and fabric covered buttons

Step 1: Take measurements to make sure your cutlery fits in. I cut a piece of fabric 60 x 42 cm, folded it in half (so what you see below is 30 x 42 cm, with the fold at the bottom)...

DIY baby travel meal set - with tutorial

...and then folded over again about 8 cm over to measure the pocket for the cutlery and the placemat.

DIY baby travel meal set - with tutorial

Step 2: cut the batting. You will need a piece half the size of your fabric. Since my original fabric was 60 x 42 cm, my batting was sized 30 x 42 cm (the size of the folded fabric)

Step 3: Iron your fabric to mark the fold for the pockets, and also the middle of the fabric, where your pouch will fold over. This is not essential but will help you when sewing.

DIY baby travel meal set - with tutorial


Step 4: Temporarily unfold the "pocket" and place batting in between the two layers of fabric, and then fold the pocket over in place again. 

DIY baby travel meal set - with tutorial

Step 5: Pin the fabric + batting in the middle (the marking you made when ironing) and then find the middle of your left side pocket and pin it too (just remember that the middle of the left side pocket is not necessarily the middle of the fabric, since you need to take the seam allowance into account - like the image below, your "middle" will be somewhat deviated towards the right side of the fabric). 

DIY baby travel meal set - with tutorial

Also, make sure you pin just the top fabric and the batting. The other layer of fabric (which will be the outside of the pouch) should not be pinned.

Note that I only had two pieces of cutlery and one placemat, so I only needed two pockets on one side and a larger one on the other. It you have additional pieces of cutlery, besides adjusting the measurements, you may also want to sew additional pockets.

Step 6: Sew the pockets. This means that you will unfold the unpinned layer of fabric and sew where you pinned, from the bottom to to the top of the pocket fold (joining everything together but the exterior fabric). Remove the pins after sewing.

DIY baby travel meal set - with tutorial

Step 7: Put the pieces of ribbon in place. Center them on each side of the pouch, as shown below.

DIY baby travel meal set - with tutorial

Step 8: Place the part of the fabric you unfolded over the pocket side of the pouch, right sides together (basically you will be folding the fabric in the opposite direction as it was before), with the ribbon tucked in between. Pin all around. 

DIY baby travel meal set - with tutorial


Step 9: sew all around. You'll be sewing on three sides (because the bottom is folded) and you need to leave a small opening on one of the sides to turn inside out. After turning inside out, it should look like this:

DIY baby travel meal set - with tutorial


Step 10: close the opening and top stitch all around (all four sides, this time). Embellish as you wish (optional). I added three yo-yos and fabric covered buttons. 

DIY baby travel meal set - with tutorial

And you're finished. Put the cutlery in place in the small pockets and add a placemat or a napkin to the larger pocket.

DIY baby travel meal set - with tutorial

I made a matching placemat to complete the set. Click here for that tutorial.

DIY baby travel meal set - with tutorial

DIY baby travel meal set - with tutorial


Happy Monday,

keeping it real, craft blog


Sandy's P.O.V.


Thursday, January 21, 2016

5 amazingly easy projects to sew for babies

The ABC Crafts Series: B is for...baby

Yes, this is week three of the ABC Crafts series and we are still covering letter B. Last week I shared a roundup of wonderful beading projects, but this week I'm repeating the letter to show you some pretty easy baby ideas too.

In case you missed the previous posts, the ABC Crafts series will be covering one (or more) crafts for each letter of the alphabet during 2016. Each roundup features 5 links, grouped around the major theme. All links posted will be DIY tutorials with clear instructions and/or free patterns, so that everyone can easily replicate them.

I've now created a specific page for the series, which will include links to the crafts already covered, and a list of upcoming topics. You can find the page here. If you have suggestions for any of the topics, feel free to leave me a comment or send me an e-mail and I will try to include your ideas as much as possible (with proper credit)!

5 amazingly easy projects to sew for babies


And now, without further delay, let's check the 5 easy baby projects I found for you today! I picked 5 things that are not only useful and quick to make, but also so easy that even beginners can tackle them. They are perfect for gifts to new babies or expectant mothers, baby showers and, of course, to make for your own babies.


Monday, October 5, 2015

Easy & Inexpensive DIY Baby Blanket

I have been a lazy crafter these past few weeks but yesterday I finally managed to finish a project! Yay!
 
easy and inexpensive DIY baby blanket

This baby blanket is probably one of the easiest projects I've ever tackled and, in retrospect, I don't even know why it took me so long to get it done.

Monday, August 24, 2015

Custom baby gift & gift package

When I need to find a gift for a new baby and I have no idea of what the parents want or need, I often resort to making a custom baby bib. Because you can't have too many bibs and a personalized one is always cute.
custom baby gift and gift package, embroidered baby bib, upcycled gift package

The easiest way to do this is, of course, to buy one of those pre-made bibs with a bit of aida fabric on the front, thus ready to embroider.
custom baby gift and gift package, embroidered baby bib, upcycled gift package

This one is from DMC and I cross stitched the name of the baby to be in bold, girly colors (originally I took additional pictures, but then somehow managed to erase them before actually writing this post). 

custom baby gift and gift package, embroidered baby bib, upcycled gift package
The cross stitch chart is also from DMC and I found it on Pinterest. You can download it here

https://www.pinterest.com/pin/58969076347492354/

To complement the baby bib I decided to make a cute gift package too. I used my cereal box to gift package tutorial to create a one of a kind gift package, ideal for a baby girl.  

I started with a box of baby cereal and covered it in pink self adhesive paper.
custom baby gift and gift package, embroidered baby bib, upcycled gift package


Then I glued some glittery hearts and added a matching ribbon. 

custom baby gift and gift package, embroidered baby bib, upcycled gift package
Perfect! One pretty custom made inexpensive baby gift that any expectant mother will love!

custom baby gift and gift package, embroidered baby bib, upcycled gift package

Enjoy and have a great week!