Has the Furby mania already reached your house? My son got a Furby on his birthday and since we don't have a real life pet, Furby has become a sort of family mascot. He is a lively little character but sleeps peacefully if left on his own with low noise levels.
 |
| Our Furby sleeping on the dining room table |
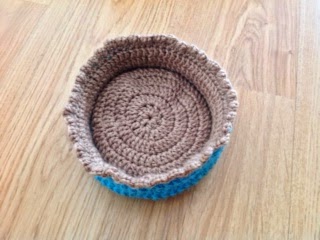
It is a very simple project that can be made any size you want or need and I took some pictures of the basket in the making to put together a small tutorial in case anyone wants to replicate the process. Depending on size, it is a good project to use your yarn leftovers (mine were leftovers from the crochet spiral pillow)
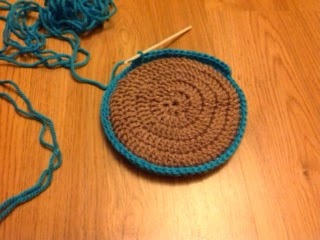
Start with a round crochet piece for the bottom. I inserted ten double crochets into a magic ring and went from there, increasing as needed to make the piece flat.
If you are making the basket using two different colors like me, you will need two circles, one in each color (outside and lining) and also a circle of cardboard (I used a sheet of clear plastic leftover from another project, so go with what you have at hand) to put in between the circles. This will keep the bottom of the basket sturdier and helps maintain its shape better, especially if you are using soft yarn.
Now join the two circles with a single crochet, using your outside color of yarn, with no increases this time, since you want the crochet to go up instead of to the sides). Keep the plastic in between the circles.
Once this is done, continue all around with double crochet. Again, no increases. Add rows until the side of the basket reaches the size you want.
Now pull the side of the basket down, exposing the bottom lining side and using your lining yarn add a row of single crochet from the bottom up.
With this you will be basically adding a second side to the basket inside the first one, so once you turn the first side you crocheted back in place you will have your lining:
Now all you have to do is to join both lining pieces at the top with a single crochet, using whichever color you prefer. I used the lining yarn to get a contrast but you can use your outside yarn or even add a third color, no rules here!
As from now, your basket is finished, unless you want to add some more detail. This is what I did:
(five single crochets in one hole, slip stitch in the next hole, repeat until completing the circumference)
This is how it will look once finished
In the end I passed a single yarn though the holes in the top and tied a knot and a bow
Furby seems to like his nest, but I've tested for other purposes as well and it seems to work just fine. It looks great with my crochet supplies for another project, so I definitely see more lined baskets in my future.
I hope you enjoy,


.jpeg)
.jpeg)
.jpeg)

I have recently learned to crochet but I am only at a single stitch and a double stitch level and trying to make a blanket. This looks to be hard fro me at the moment.
ReplyDeleteNew follower
Hi Melissa. You really only need single and double stiches for this basket. In case you want to try it out and have any questions, let me know and I'll try to help.
DeleteCute Teresa...I would probably make it a little bigger, love the fact that it's lined!!
ReplyDeleteThanks for sharing!
Thanks Bobbi. I agree with you, if it hadn't been the Furby special request, I would have made the basket bigger too. Have a great weekend.
DeleteAbsolutely darling! Thanks for linkin up to Sunday FUNday!
ReplyDeleteThank you for visiting Kristine. Have great weekend.
Delete