
After a series of less than fortunate mp3 players, my husband bought me an Ipod Shuffle for my birthday last year and ever since then I've been using it faithfully whenever I go to the gym. I've also been wanting to get a sports armband, to avoid having to hold the Ipod in my hand (sometimes I just roll the ear-buds cord around my neck at let it hang loose, but I'm pretty sure that's not exactly conducive to a long life either for the ear-buds or the Ipod itself).

Last weekend, I had enough and decided it shouldn't be too hard to make an armband to fit me and my Ipod.
So here is the story of how my homemade sports band came to be, along with the tutorial and the pattern, in case anyone wants to make one too.
Materials required:
- the pattern (download here). This is an Ipod Shuffle sized pattern, but you can adjust the size to fit whatever device you have.
- fabric for the exterior of the pouch (I used an oil-cloth type of fabric to keep humidity out)
- fabric for the lining (I used the leftovers from the Ipad cover I made last year)
- a piece of wide elastic (long enough to go around you arm, overlapping a bit)
- a few bits of velcro
Step one:
download and print the pattern
cut one piece out of your exterior fabric and one of the lining (cut fabric along the pattern's dotted lines, sew along the solid lines)

cut the elastic in half and pin it to the right side of one of the pieces of fabric
place the exterior fabric and the lining right sides together (with the two pieces of elastic tucked in between

Step two:
sew long the top and the sides of the pouch, leaving the bottom open, and turn it inside out through the opening

fold the bottom edges in, pin in place and top stitch (closing the opening)

Step 3:
fold the pouch piece as shown, and top stitch all around.

I hand stitched it because the combination of the oilcloth and thick lining made it difficult to machine sew it effectively and I gave up after a couple of thwarted tries. But if your fabrics allow, machine sewing will not only be faster but create a smoother finishing


Step 4:
cut two small pieces of velcro (I used the Sizzix to cut circles, but shape is really irrelevant. Squares or rectangles work perfectly too)

Sew the circles in place in order to ensure that the pouch closes:

Step 5:
cut two longer pieces of velcro, and pin them to the tips of the elastic pieces. My pieces of velcro were about 5 centimeters long, because I wanted to make sure I could use the band either on my arm or mt wrist and I wanted it to adjust either way.

Note that you need to pin each of the pieces of velcro on different sides of the elastic, to make sure they attach to each other:

Sew the velcro in place and you're done!

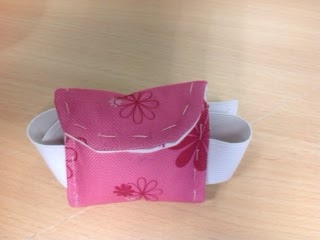
Now you have one pretty inexpensive sports arm band perfect to use in the gym or outside, to take advantage of the summery weather. It comes together in half and hour and because if it's small size, it's great to use those fabric scraps we all have around, leftovers from other projects.

You can use it on your arm (sorry about the quality of the pictures, I had some difficulties taking a picture of myself using the armband)...

...or on your wrist...

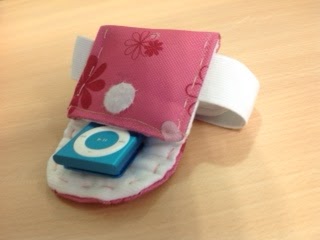
...it has room to store the ear-buds...

...or to let the cord hang loose when you're wearing it:

All in all, an easy and useful project, that also makes a great summer homemade gift!
Enjoy your week!

This is so cute!
ReplyDeleteThank you Christine!
DeleteThis is such a cute idea and turned our great! :)
ReplyDeleteThanks for joining Cooking and Crafting with J & J!
Thank you Jess!
DeleteSuper cute! I bet it's nice to have an easier way to carry the shuffle, too.
ReplyDeleteI came to your blog today through a link up, and I wondered if you might be interested in joining in another link up. My mom and I post one each Friday called Crafty Comment Karma, for people to link up any of their crafting, quilting or sewing posts. It's open for the whole week until the next one goes up, so I hope you think about joining us! Link-up located here: http://bit.ly/1FT3LsD
Thank you Laura! I've added your party to my link parties pages to be sure to link up to the next parties!
Deletethis is a wonderful bit of craftiness. Thank you for sharing at the Thursday Favorite Things blog hop. Watch for your feature on Monday xo
ReplyDeleteThank you Katherine! Have a great weekend!
DeleteSuch a cute idea Teresa and it will come in so handy!
ReplyDeleteThank you Lara. Have a wonderful weekend!
DeleteCute! I get so excited each week to see what you have been working on because it’s always AMAZING! Thank you for sharing this with us. Pinned and tweeted. I hope to see you on Monday at 7 pm, so we can party!!!! Lou Lou Girls
ReplyDeleteThank you Kimberly!
DeleteI love the pink. And what a clever way to prolong the life of you iPod.
ReplyDeleteAnd it's really practical too. I've been using it in the gym these past weeks and the difference is amazing. I'm no longer worried about keeping the iPod safe and I'm enjoying the workouts a lot more!
DeleteWhat a great idea Teresa and a wonderful tutorial!
ReplyDeleteThank you Connie!
DeleteVery cute!! Thanks for sharing on My 2 Favorite Things on Thursday!! Hope to see you again!! I love having you!! Pinned!!
ReplyDeleteThank you Elaine!
DeleteNow THAT is a really clever idea. For some reason the slightly dated expression "nifty" is in my head about now, it's not a phrase I normally use, more something my Nan used to say. But you know what, this really is a nifty idea!
ReplyDeleteThank you Julia!
Delete