Keeping it Real: March 2014

Tuesday, March 25, 2014

Pencil case and notebook cover

In case you're wondering about the work in progress that I mention around here once in a while, don't wonder any more. I haven't finished anything from my pile of unfinished items.

I have, however, been busy with something else:


One of my son's friends from 1st grade turned seven and invited us for her birthday party last Sunday. Since my daughter was invited as well and she felt she must take the birthday girl a present, instead of buying two presents I decided to buy one and make another.

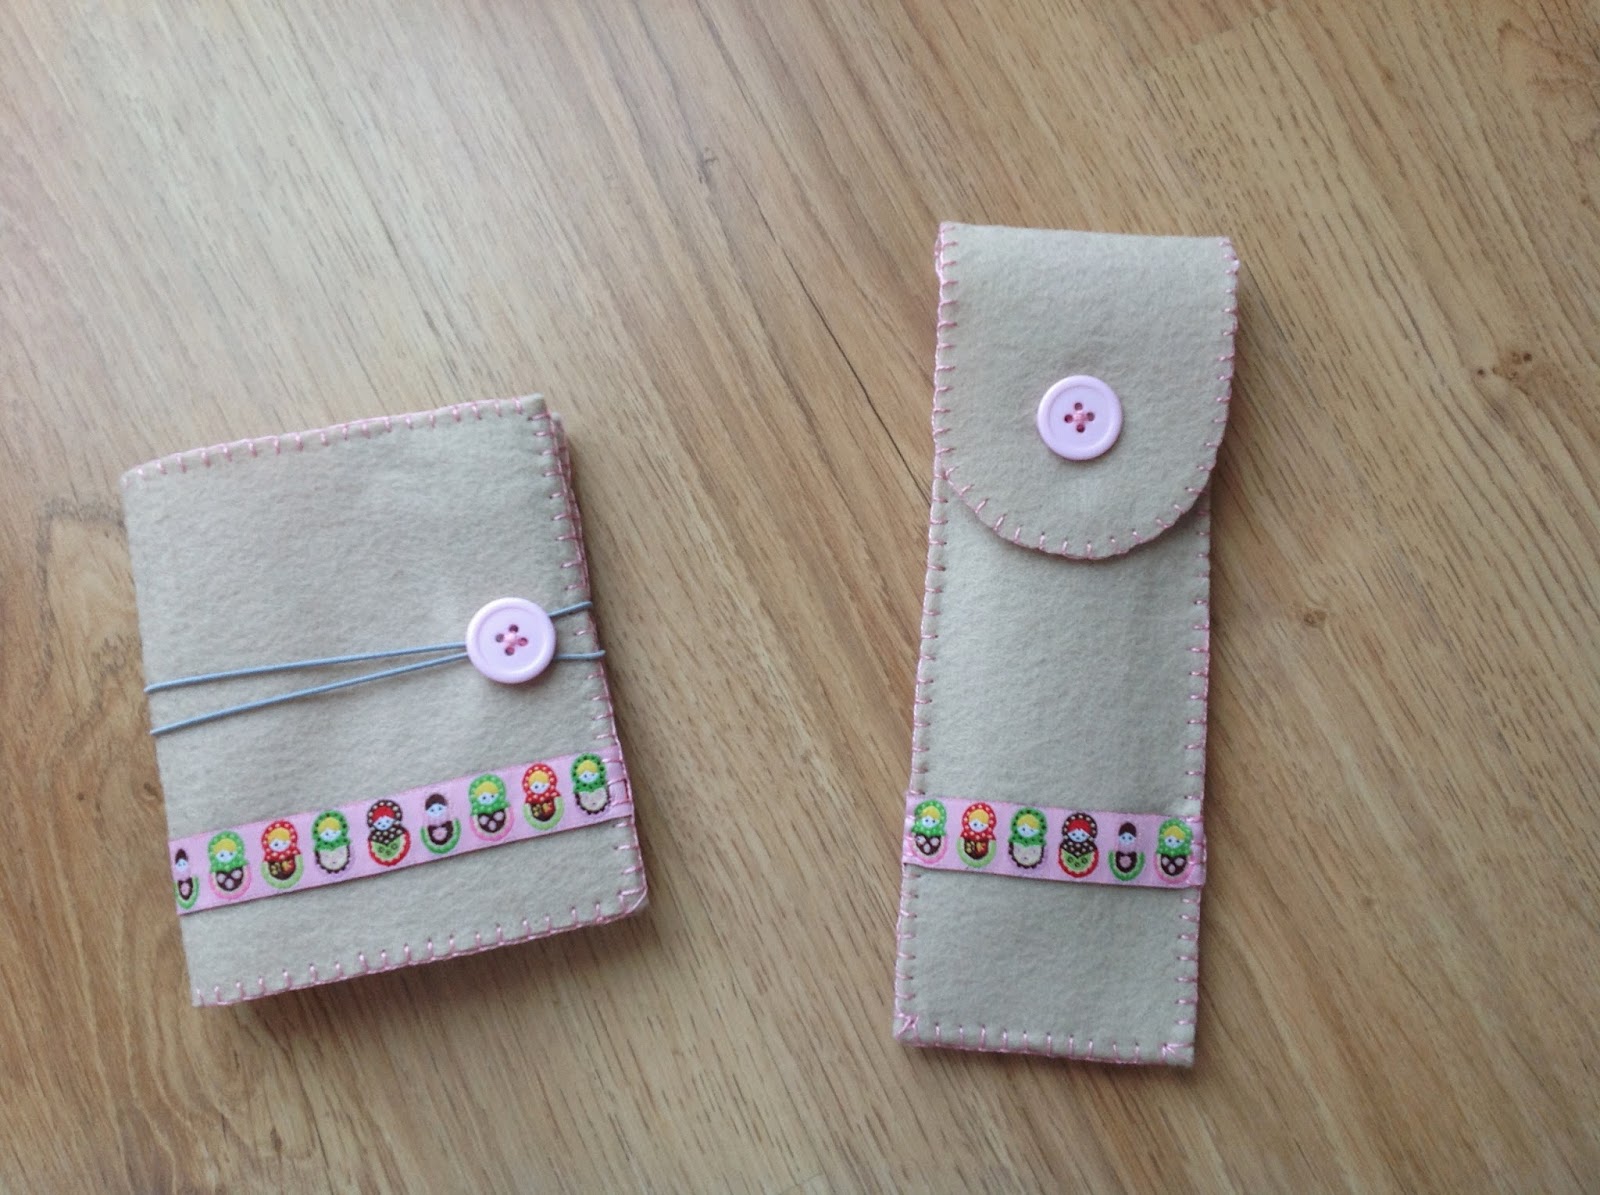
For quite some time I have been wanting to do something with matryoshka dolls, so I figured this was just right. Since (as usual) I was pressed for time, I had to keep it simple and this is what I came up with.

The pencil case is made of felt, bordered with a blanket stitch.


Originally I was going to add a felt matryoshka as embellishment, but then I found a piece of this matryoshkas ribbon in my stash and figured it was an easier route:


I have, however, have an unfinished matryoshka lying around my sewing table and I hope she can make an appearance here someday. Back to the pencil case, I also added some colorful pens I had left from another project.


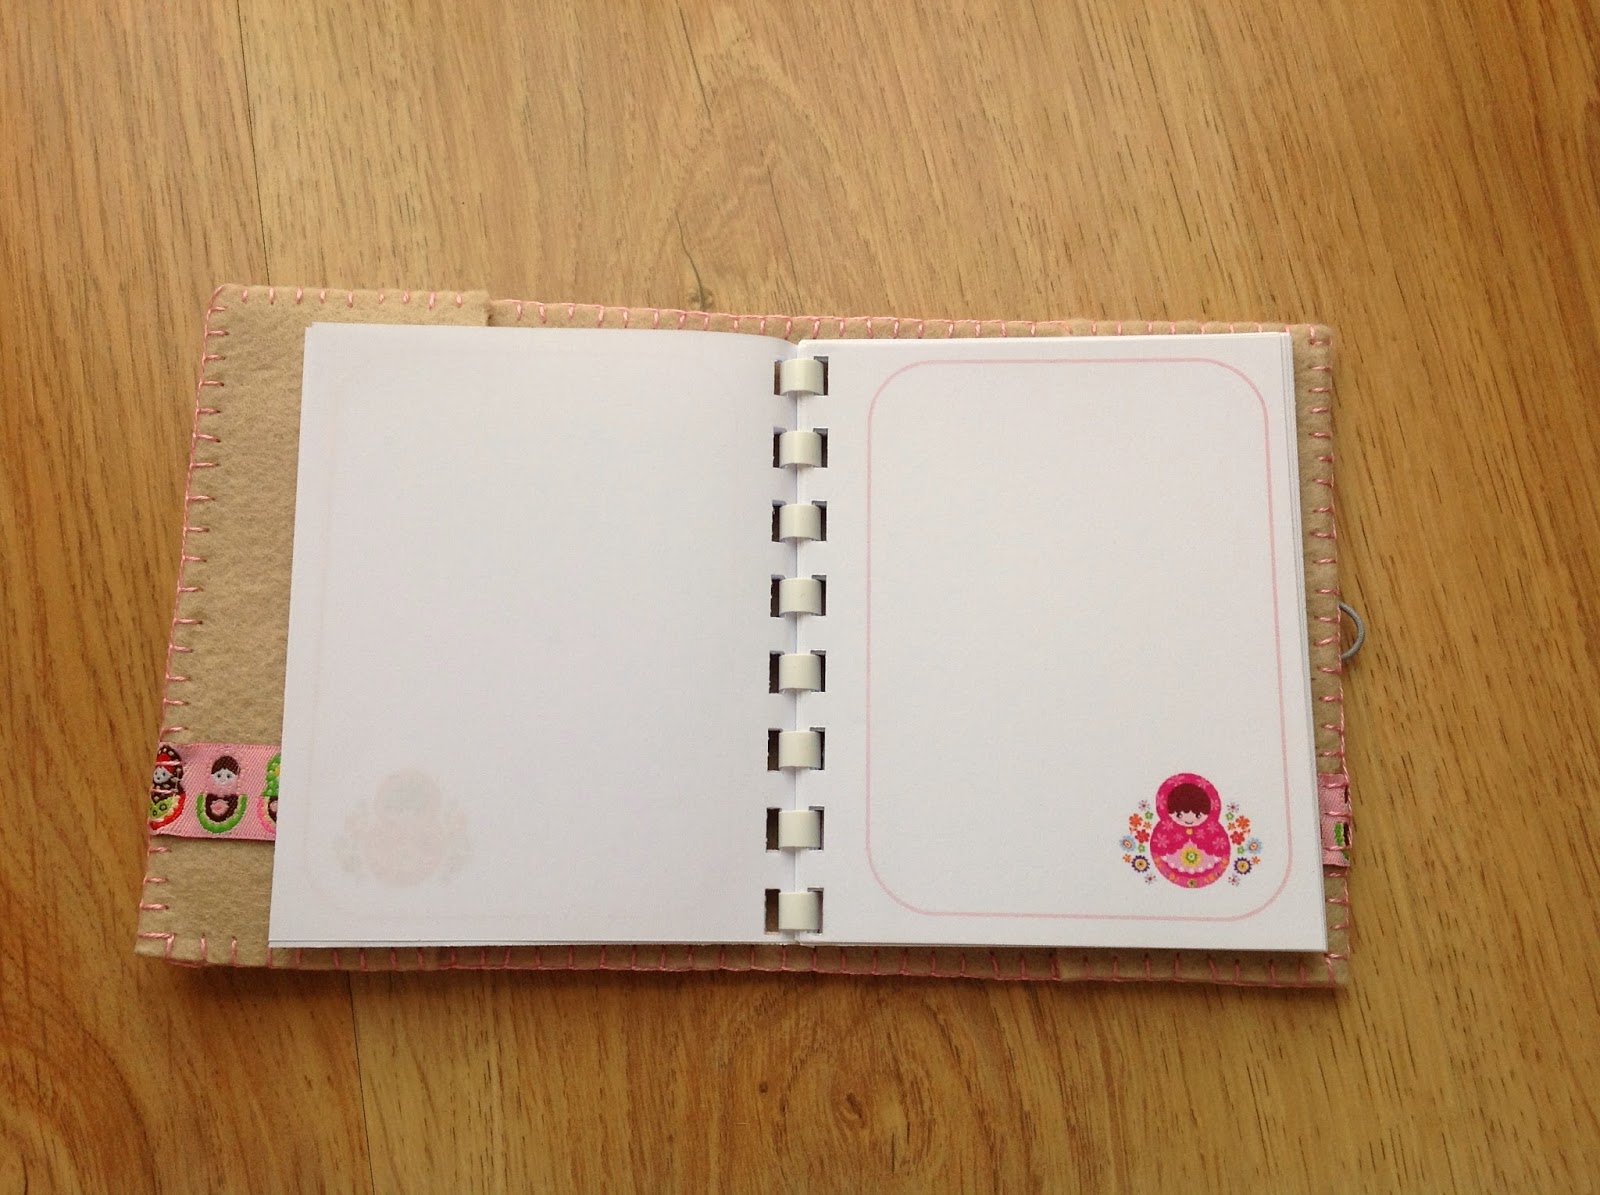
For the notebook, I used Powerpoint to design some cute pages, printed and cut them and turned them into a small notebook, with a heavier scrapbook pink paper for cover.


Then I made a cover out of felt. The idea is exactly the same as the 5-minute book cover, just adjusted for size, and instead of machine sewing it I used a blanket stitch to match the pencil case (and the same ribbon). The pencil case closes with just one button, for the notebook cover I also added an elastic.


I finished both pieces with time to spare (on Saturday morning) and then I came up with a really cute package (of which I forgot to take a picture). This gave me the idea of making a list of tips for wrapping handmade presents in style, so stay tuned.

See you around,
Teresa


Craft-O-Maniac Monday Link Up #12

Skip To My Lou


Monday, March 24, 2014

Spring is here!!!

Spring and Summer are my two favorite seasons but Spring, with longer daylight hours and flowers blooming everywhere, brings about the promise of sunny days and long warm evenings and just makes me smile. I'm a happier person just because it's Spring.

(@ my grandfather's garden, last Saturday)

Happy Spring everyone!


Teresa

Tuesday, March 18, 2014

Boy pants to girl shorts

Boy wrecked pants, to be exact.


This is a common sight when my son comes home from school. When the pants still fit him well, I usually find a way to patch them and make them last at least a couple of months more. In this case, they were already running on the short side, so it was pointless to waste time with patches. So I decided to turn them into shorts for is younger sister.

If you remember this post, this was one of the projects that I had planned to finish last week. Although a few days late, it is still the first one of the three to actually see the light of day.

Anyway, I cut the pants legs above the holes in the knees and hemmed them. Then I crocheted a border. I kept it as simple as possible, but if you look around Pinterest (my endless source of inspiration) there are dozens of alternatives in all shapes and sizes.


To make the shorts more girly, I added three crochet flowers in the left leg. Initially I thought about using buttons for the center of the flowers, but as I went through my stash I found nothing with the appropriate size/color, so I used beads instead.


And here they are, a pair of girl shorts, ready for Spring:


See you around,
Teresa


Skip To My Lou

Craft-O-Maniac Monday Link Up #11

Monday, March 17, 2014

Happy St. Patrick's Day!!!

We don't usually celebrate St. Patrick's in our family, but one of my best friends is addicted to Ireland and all things Irish.

And this year, because she knows I work a lot with felt, she asked me to make her a pin or a brooch, something green (of course) but that she could wear to work without being too obvious.

After some debating, a lot of Pinterest and a huge mess in the floor of my guest/sewing room...


...this is what I came up with:


I forgot to take pictures of the back but the felt is sewn to a brooch safety pin I got at a craft store, along with the green beads in the center.


May your blessings outnumber
The shamrocks that grow,
And may trouble avoid you
Wherever you go.

(Irish Blessing)


Teresa


Craft-O-Maniac Monday Link Up #11

Skip To My Lou

Monday, March 10, 2014

Too many projects, too little time...

Even if you discount the huge pile of unfinished projects (some of which will probably never see the light of day), the fact that I have a tendency to start more projects that I'm able to finish is one of those faults that I'm always thinking I should correct and never really try to. I know not to waste my efforts.

When I have an idea, I usually go ahead with it. And then, somewhere along the way, real life intervenes and I'm needed somewhere else. Dinner has to be cooked, groceries need to be put away, house must be vacuumed, the boy needs help with homework, or another of those endless strings that make up our life.

I complain about this a lot, but secretly, I do accept that that is the way it must be. It means that we, as a family, have a normal everyday life, that we are alive, happy and healthy.

Anyway, I now have three projects in my hands (not literally, right now) that I have been working on in the past weeks and that expect to share here once they are completed. Please remain seated, it may take a while.

Crochet:


Crochet/sewing:


Sewing:


Now let's see which one I manage to finish first...

See you around,
Teresa

Sunday, March 9, 2014

Friendship bracelets - the easy way

Yesterday I was stuck up at home with a bunch of kids and I had to find imaginative ways to keep them entertained, since the bad weather barred outdoor activities and I didn't want to be responsible if they all came down with the flu.

Among other things, we made friendship bracelets but I needed to find a fast, easy way to get the bracelets done before the half a dozen six year olds were bored to death. So I remembered a technique my mom taught me a long time ago to make the ties for baby booties and decided to give it a try with crochet thread.


Then I decided that since I had to explain the process to them any way, I could easily make a small tutorial. Please apologize the quality of the pictures. By that time in the afternoon my husband had already abandoned ship (not that I think he would have really helped anyway), I needed both hands to hold the threads and I was not going to surrender the Ipad (which is not really mine) to any of those six-year olds.

Anyway, start by choosing several colors of cotton crochet threads and tying them in a knot.


Then cut a sufficient length of the threads (I eyeballed it, but since you will be rolling the threads up and then folding them in half I would say you need at least 50 centimeters).


Secure the knotted end of the threads in a way that allows you to freely move the threads around. I used the wire shelf below my ironing board, especially because it allowed for several kids to be doing the same thing at the same time, but tying them to a key (as long as the key does not come off the lock) or even sticking the ends inside a closed drawer works just fine.


Start rolling the thread in one direction


Until the end of the threads


Then fold the rolled up threads in half, with one hand holding the fold and the other the untied end of the threads (this is where picture taking became trickier)


Let the finger holding the threads by the fold go and both halves will roll up again automatically


Release the knotted end from wherever you were holding it


Tie a knot at whatever size you want the bracelet to be and cut any excess thread


After a while we had a bunch of them in different colors


I even made one for myself


Once you master the rolling up part, it does not take you more than a minute to make a bracelet. The downside? The kids made them so fast that I had to come up with something else to keep them busy.

See you around,
Teresa

Friday, March 7, 2014

Barbie dolls clothes

I'm not a seamstress and I'm not a fashion designer. To be honest (and I'm supposed to be keeping it real, right?), I'm not even very talented with fabric and needles unless I have an easy pattern with very clear instructions to follow. And time.

But ever since Christmas. my daughter has been nagging me, saying that her Barbie princesses (the ones I created the closet-out-of-a-box for) only have...princess dresses. Well, obviously. It seems, however, that even princesses need everyday clothes.

So, after endless requests, I searched through my fabric scraps and my yarn leftovers...


...and we came up with two looks. The vintage look:


And the casual style:


On the vintage look, the skirt is made of the fabric you see in the first picture. I joined both edges, hemmed one side and created a casing for the elastic on the other. Just like you would to make a simple skirt on any other size. The top are two crochet squares sewn together on the sides (just in the bottom, to leave room for the arms) and closing on top with buttons. The yarn should have been thinner and the buttons smaller, but I worked with just what I had on hand.

For the casual look I actually created jeans. No pattern, I totally winged them. They were machine sewn, which was faster, but for such a small piece hand sewing is probably bound to produce a more perfect finishing. The top was made with the remaining yarn and is just a crochet tube made to fit the doll with straps sewn to it. Nothing flashy and not perfect, but enough to keep the girl entertained for some time.

There was going to be a chic look as well, using the red scraps below...


...but the girl decided that she "needed" the fabric for other purposes. Since I was running out of time anyway, the dolls will have to wait (probably a long time) for another addition to their fashion choices. Maybe they should go on a shopping spree.


See you around,
Teresa

Skip To My Lou

Wednesday, March 5, 2014

Crochet flower garden tabletop

Remember the t-shirt I recovered using crochet flowers (if you missed it, you can read about it here). At the time, I had just started crocheting flowers in shades of pink, yellow and green. Now finally the table top I envisioned for my daughter's room is finished!


Crochet flower garden tabletop


Scroll down to find out how I made it: