Keeping it Real: February 2015

Thursday, February 26, 2015

No clutter in 2015: week 8 update


Here I am for the weekly update on my 2015 goal: to have a cleaner, leaner house by the end of the year. Posting these updates helps and keeps me in track. Every weekend (and on weekdays too, when I have time) I try to tackle a different area of my house. I started with books (not near finished yet) but since then I have found lots of other areas in need. I have donated a lot of things, upcycled others, but there is still much work to be done.

This week I tackled the bathroom cabinets (two out of three, at least, since the one in the master bathroom has not been touched yet).

They weren't exactly cluttered, not in the traditional sense, at least. There was no unused stuff stored there from a long time ago, I'm usually careful about that. But they were messy. Here is an example:

declutter: how to


This is how our downstairs bathroom cabinet looked like before.

While sorting though stuff, I realized that most of the mess came from the nail polish bottles and I decided I needed a box to keep them all upright and in one place. I looked all over the house but could not find anything that fit (the downside of having decluttered a lot already).

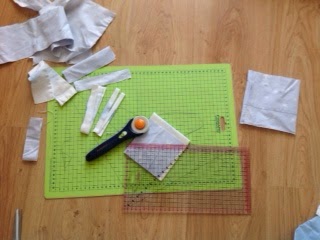
What do you don't have what you need? You make it yourself!

So I made this plastic basket to hold the nail polish bottles and related items:

declutter: how to

declutter: how to


And here is a picture of the closet after taking everything out, cleaning and putting things back in their places:

declutter: how to


This exercise taught me a very important lesson: no matter how much you declutter, how much trash you take out, if it's messy, it will still look cluttered.

Now I still have the master bathroom cabinet to take care of. And I have two bags full of stuff to donate which hopefully will find a new home on Saturday (from previous weeks' decluttering). We have a lot of things scheduled for next weekend so I'm not getting high hopes that I can tackle more than that, but I will let you know next week!


Tuesday, February 24, 2015

Cupcake topper necklaces

Yesterday when I posted my DIY stationery gift set I showed you that I had included a simple necklace:


It was something made in the spur of the moment and I never gave it much thought until my daughter saw it and said she wanted one too. Then I thought: why not? She loves "jewelry", so I might as well make her some inexpensive necklaces that no one will miss if she loses or damages and that can be easily replaced any way.


And what is the easiest way to achieve this? Cupcake toppers, of course! They already come in the right size and if you check Pinterest there are hundreds of free designs and themes. 

So I went online, chose a few with her favorite characters and printed then out...


...cut them to shape and laminated them: 


Then I punched small holes in the top of each one...


 ... and passed a soft piece of yarn through the hole. Any yarn will do, but a soft, satiny one is better since it to avoid itches, and if it comes in a matching color, all the better.


I tied a knot joining both edges and my necklace was finished!


And because they come together pretty quickly, I made lots of them:


They are great for small and not so small girls and I'm thinking they will make cute and inexpensive party favors too, so this is something that I'll keep bookmarked for future use!

Enjoy,


Monday, February 23, 2015

DIY Stationery Gift Set


This story starts with a project going wrong. On Saturday morning I had a little free time and I decided to make a Hello Kitty notebook cover (check the tutorial here). I had the actual notebook made some time last year but then something else got in the way and I lost track of it. I found it while going through the desk drawers on my decluttering endeavours.

I even took a picture of all my supplies neatly gathered.


And then I suddenly realised that I had made a mistake and one of the felt pieces was smaller than the other. And I didn't have at home enough felt in the same color to cut a new piece. After some brainstorming (and a lot of cursing myself) I noticed that the two pieces could be adjusted to form a felt envelope and decided to sew them that way.


To close the envelope I sewed two pieces of velcro, cut in the shape of circles for a neater finish. By this time I was still thinking I would just put the notebook and the matching coloring pens inside the envelope and be done with it.


To keep within the theme and hide the stitches used to secure the velcro, I glued the Hello Kitty figure on the edge of the flap:


The Kitty figure is store bought and came in a pack of two from the craft store. And exactly because I had two, I decided to use the second one to embellish the piece of pink elastic sewed to form a ring and used to hold the coloring pens together.


And then, inspiration struck. A notebook would not look very cute inside an envelope. But a stationery set would. And while it is true that paper stationery is less and less used in today's digital world, my experience with girls tells me that they still like to pretend they are writing and mailing letters. At least my girl does and she barely knows how to write anything but her name.

So I went online, logged into the never ending resources of Pinterest and chose some free printable letter paper and matching envelopes, printed a set of each and tied it with a bit of silky yarn.


And while I was at it, I also made a matching necklace (I'll post a tutorial on this later): 


Here is the complete set:


And if it is true that this project started on the wrong foot, I'm pretty happy about the way it turned out. Although I make a lot of handmade gifts, this was something completely new to me, that only came about because of my initial mistake.


And not only do I think this felt envelope "thing" has potential (I have several other ideas germinating right now), but I still have the unused notebook to finally make a cover for, so I have my work planned out for the upcoming weeks.

Enjoy,


Friday, February 20, 2015

Reuse & upcycle: pillowcase from...other pillowcases

As you've probably have heard before, I'm decluttering my house. Some weeks ago I went through my daughter's closet and found several small pillowcases from when she was a toddler.

None of the pillowcases fit any of the pillows we have in our house now, but the fabrics were cute, packed with memories and I clearly wasn't ready to part with them. But I'm committed to decluttering, so I had to find a solution: a new, larger pillowcase made with a mix of all the fabrics.


reuse, upclycle, pillowcase, pillowcover

This was my first attempt at something remotely quilt-looking, and while I like the outcome (even if some of the squares are not perfectly lined up), the whole process was too long and difficult for my taste. Or maybe I just need more practice.

Anyway, I started with a bunch of small pillowcases (not all pictured below but all in need of a good ironing)...

reuse, upclycle, pillowcase, pillowcover

...and began cutting squares. I love to see quilts made with lots of different shapes, but I decided to keep this as simple as possible and I figured squares would be the easiest to sew.

reuse, upclycle, pillowcase, pillowcover


Deciding where to place each square took some time...

reuse, upclycle, pillowcase, pillowcover


...and sewing them all up even took longer

reuse, upclycle, pillowcase, pillowcover


The back of the pillowcase is made with white fabric and a plain envelope closure. The white fabric was also reused, as it came from a crib sheet.

reuse, upclycle, pillowcase, pillowcover


Well, it may have not turned out exactly perfect, but has been in use several times since I finished it. And since I replaced several unused items piling in a closet by a functional pillowcase, I consider it a sucess.


Now I still have a bunch of crib sheets in need of some serious upclycling, so I must find inspiration and decide what to do with them...

Enjoy,


Thursday, February 19, 2015

No clutter in 2015: week 7 update & lego storage


This week I tackled toys. My kids receive way too many toys on Christmas and birthdays and once in a while I have to purge their closets. This time I focused mainly on toys with broken pieces or otherwise unusable and that, for some strange reason, seem to always show up in the back of the closets (instead of the trash can were they should have been put in the first place).

And then I turned to Legos. My son is a huge Lego fan and I actually have a Lego city built in a corner of my living room, complete with railways and even a Christmas carrousel (very cute but a pain to keep dust free).

Most Lego sets come in cardboard boxes and usually include several extra pieces. Until now we had been keeping each of the boxes, with its respective instructions manual and extra pieces in a shelf of his bedroom closet. But is was getting too crowded, and besides I need the space to store other toys and game boxes and reduce the amount of stuff spread around.

So I devised a quick storage system. All unused Lego pieces and half assembled items went into a storage box (that was already in his closet full of clutter we got rid of)


The instructions manuals are now duly archived for future reference:


And the cardboard boxes? Sent to the recycling bin (below is just one of the piles that left our house last weekend):


Better? Yes. But I'm still not totally happy with this Lego storage thing, so I'm open to any suggestions or ideas you may have.

The decluttering effort continues, though I still have not decided what to tackle next. I'll let you know next week...


Wednesday, February 18, 2015

Easy Winter Hat - the boy version

Last week, when I posted the Easy Winter Hat Tutorial, I mentioned my son had requested a hat too. So I had to comply.


I followed my own pattern and used a very similar yarn, in boy colors. Originally my son wanted the pompom in green, but I couldn't find yarn to match, so we compromised on blue instead (with the promise that I will search for green yarn and make him a green hat next year).


And in case you're wondering, yes, I did make a matching scarf. I just skipped the pompoms in both ends because I thought they looked too girly, and opted for just the matching solid blue stripes. 


This knitted hat/scarfs thing is turning out to be a never ending story. It started with the hats I made for my daughter's dolls, just to get back into the habit of knitting, then my daughter wanted  some for herself and I posted them along with the tutorial. Now I'm posting the ones I made for my son. The end? Not really. Now my husband wants a scarf too. In black or very dark grey. Maybe I should just open a store and start taking orders...

Enjoy,