
So this week I took advantage of the fact that I'm not working full time yet and decided to prepare myself for a birthday party we have on the 14th for one of my son's school friends which is turning seven. I made a kitty notebook cover.

I basically followed the themed notebook covers tutorial I posted a while ago so I did not take a lot of pictures this time. The only difference is the closure, so I'm adding some details on that.
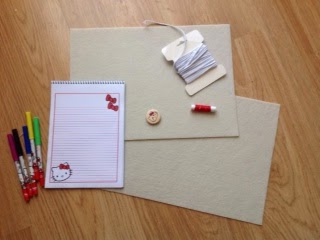
The materials you need are simple: felt, a notebook of your choice, pens (I had on hand some Hello Kitty colouring pens so I used those to match), thread, one large button (again, a Kitty one I had in my stash) and some elastic.

Everything should be clear in the tutorial but let me know if you have any questions.
Then pin both felt pieces right sides together and sew around the sides. This is where the kitty cover is different from the tutorial, since I did not included ribbon to tie a bow and close the notebook. I'm using elastic and a button instead this time.
To do this, measure and cut a piece of elastic that, folded in half, is enough to around the side of the notebook cover, as shown in the picture:

Then sew both ends of the elastic to the front of the notebook cover:

And sew your button on top of the elastic endings, thus effectively covering them. You should get something like this:
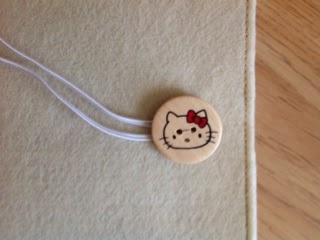
You are done! The elastic goes around the back of the notebook cover and it is then secured to the button in the front again.
Enjoy!


Great idea! I pinned this to Pinterest.
ReplyDeleteThank you Kim!
DeleteThe Hello Kitty notebook with the Hello Kitty button, pad of paper and pens is just so darn cute! Thanks for sharing.
ReplyDeleteThank you for stopping by Daryl
DeleteThis is so cute.
ReplyDeleteThank you Deedra!
DeleteVery cute!
ReplyDeleteThank you Amy, I'm glad you enjoyed it!
DeleteThis is so cute, and I love how you can personalize them to fit your recipient's interests. Great job!
ReplyDeleteThank you Mandee!
DeleteOh goodness...such a cute idea! And the designs are endless!
ReplyDeleteThanks for joining the Link Up this week! Don't forget to enter to win a $25 Starbucks giftcard! :)
Thank you for hosting. And you are right, you can make almost any design you want!
DeleteSo sweet! That button was perfect for this project! Nice!
ReplyDeleteLovely project! Pinned and shared around :) Thanks for sharing at CAL link party: http://www.mazkwok.com/2014/09/crafting-along-59.html
ReplyDeleteThis is so cute. Thanks for sharing at Monday Handmade Linkup party.
ReplyDeleteThank you Judy, it is always a pleasure to link-up!
DeleteAdorable!!! I <3 book covers:) Pinned
ReplyDeleteThis is such a cute project. I love the idea to use it for a birthday gift for a young girl. Thanks for joining us at the Mommy Needs a Time out Thursday Link Up!
ReplyDeleteWhat a fabulous idea for a birthday present, Teresa!!! And what a cute, cute button to match the notebook.
ReplyDeleteFeatured today, Teresa.
DeleteThank you for Pam!
DeleteI would have loved this as a little girl, but the truth is I would still love this.
ReplyDelete