

This weekend I had a special request from my daughter to make her an apron to match her play kitchen. Because I needed something fast (otherwise it wouldn't have been finished during the weekend anyway) I didn't even bother to look for patterns online and this is what I came up with:

It's a reversible hostess apron with two pockets (or rather one large pocket divided in two) and so easy it can be made in well under one hour.
If you want to make one, here is a small tutorial. You will need two different fabrics and some ribbon for the ties.

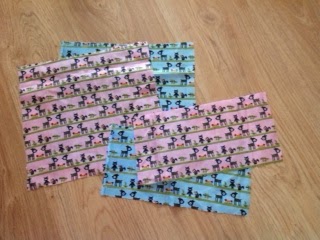
Download the pattern and then cut one apron body and one pocket from each of the fabrics.
Fold fabric at the top of one of the pockets and hem.
Do the same with the other pocket.

Pin each of the pockets onto the contrasting fabric, find the center of the pocket and sew a vertical line. This will divide your pocket in two smaller pockets but will also keep the pocket fabric from sagging (note that the sides of the pockets are still pinned but not sewn).


Pin fabric at the top of the apron body to create two little pleats in the center. This is totally optional but adds a nice flair (the pictures below should be self explanatory but let me know if you have any questions).


Cut the ribbon for the ties and pin it on one of the apron body pieces on the wrong side of the fabric.

Then pull the ribbon onto the right side of the fabric and pin again, to make sure it stays in place.

Put the apron bodies (with the pinned pockets) on top of each other, right sides together, with the ribbon tucked in between and pin again.

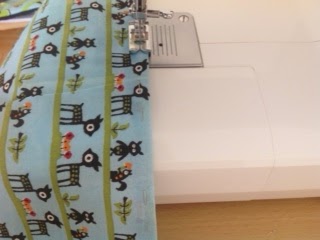
Sew around the top, sides and bottom of the apron, but leave a small opening at the bottom. Remove pins and pull the apron inside out through the opening at the bottom.

To stitch all around (make sure you close the bottom opening) and trim any excess ribbon. Now you have one mini hostess apron that can be worn on one side...
... and on the other...

... and that is the perfect addition to any play kitchen...

...for those late summer tea parties.


The pattern was sized to fit my almost 4 year old and set to print on A4 paper, but I have added a measure in centimeters to make it easier in case you print it on a different paper size. It should also not be very difficult to re-size it to fit smaller or bigger children, or even an adult.
Enjoy,

It's such a fun little apron. What a joy to see your daughter using it.
ReplyDeleteThank you Ann, I'm glad you stopped by.
DeleteJust an adorable mini hostess apron, love everything about it and your tutorial is great. Thank you for sharing with the Clever Chicks Blog Hop! I hope you’ll join us again next week!
ReplyDeleteCheers,
Kathy Shea Mormino
The Chicken Chick
http://www.The-Chicken-Chick.com
I'm, glad you enjoyed it Kathy, and thank you for visiting.
DeleteWhat a sweet little apron, Teresa! How fun! Love that it is reversible. Your daughter must be so pleased!
ReplyDeleteThank you Lorna, I'm glad you stopped by.
DeleteAdorable apron and fabric!!!!
ReplyDeleteUm mimo!!! Os tecidos são mesmo giros! A minha sobrinha ia adorar :)
ReplyDeleteBoa semana,
Beijinhos,
Ana Love Craft
www.lovecraft2012.blogspot.com
Your apron really is the perfect addition to a play kitchen. Lovely fabrics you've chosen and a bonus that it's reversible, Teresa.
ReplyDeleteVery cute. One lucky girl
ReplyDeleteWhat a sweet idea!
ReplyDeleteun delantal muy facil, gracias por la explicacion.
ReplyDeleteUnas telas bellisimas
What a cute little apron! Great tutorial. I hope you gets lots of yummy food from that little kitchen. Mine love making me food to eat from theirs.
ReplyDeleteWhat an adorable little apron. That is one lucky little girl. Thanks for the tutorial.
ReplyDeleteLooks like a perfect addition to her little kitchen!
ReplyDeleteThat is so cute! I would love for you to share a project on my Meet Up Monday Blog Party!
ReplyDeletehttp://jennymaire.blogspot.com/
Thank you everyone for your kind comments and thank you for visiting.
ReplyDeleteOh it's so sweet! Love the fabric and I bet she looks like a little doll all dressed up and standing in front of her fun kitchen! Thanks for sharing with SYC.
ReplyDeletehugs,
Jann
Love the pink ribbon! Thanks for sharing your cute project at CAL link party :)
ReplyDeleteYes I want to make one. That is so quick and simple and my daughters (and sons) would all love one!!
ReplyDeleteBoth my kids love to play kitchen! Try it out and let me know how it goes!
Delete