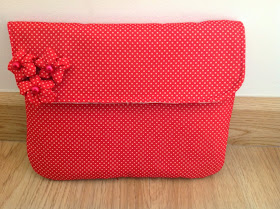
Can you tell I'm into bags lately?
Last weekend I was toying around with the little girl bag pattern and decided to try to make a messenger bag. Halfway through testing the pattern, I realized that without the strap the bag could also be used as a clutch.
So here you have it, my latest experience, which actually came out as a 2-in-one pattern.
If you want to make one, download the pattern here. Note that the back piece of the bag is too big to fit into one page, so you will have to cut along the dotted lines and glue part A to part B after you print the pattern.
Once your pattern is ready you will need to cut one front piece and one back piece from your exterior fabric, from your lining fabric and from batting.
For this type of bag I don't recommend an exterior fabric with a pattern that must be sewn in one particular direction. Since you will be folding the back piece in order to make the bag flap, part of your pattern will always be upside down.
Start with your exterior fabric. Lay one front piece and one back piece right sides together (the back piece is symmetrical, so there's not need to worry about top and bottom), with the the batting on either side.
Sew around the sides and the bottom and turn inside out.
Do the same with your lining (minus the batting) but leave an opening in the bottom. This time I positioned my opening in the corner because I found that it will give you more room to turn the bag inside out once everything is sewn).
Slip the outside part into the lining, right sides together and sew along the top and sides of the back piece and the top of the front piece.
Turn inside out through the hole in the lining, hand sew the opening closed and tuck the lining back into the bag.
Pin along the edges and top stitch (this is not essential, but it will give your bag a more "professional" look).
Sew a snap to keep the bag closed and embellish as you want (this time instead of yo-yos I added fabric flowers and matching beads)
At this point you have a finished clutch.
In this version I did not add an interior pocket, but if you want to have one, please refer to this tutorial and follow the instructions there.
Add a strap and you have a messenger bag.
Note 1: my patterns are drafted in A4 size paper (210 mm large by 297 mm high). If you are printing the pattern in a different paper size you may need to make adjustments. I have added a scale in centimeters in one of the pattern pages to make it easier for you.
Note 2: this time I did not take as many pictures as in the previous tutorial, so if you have any questions either refer to this post or leave me a comment and I will get back to you.
And last but not least, here is the pattern again, in case you missed it above.
Enjoy,


Great bag and fabulous tute! I'd love to see you join us at Inspire Us Thursdays: Sew Needle Stitch Hook on www.theinspiredwren.com.
ReplyDeleteComing here from the Sew Many Ways linky party! Love how easy this is to put together. I especially like the flowers and the beads that you used. They add such a nice touch.
ReplyDeleteGreat looking bag and well explained tutorial. Thanks for stopping by at the hobnob which I am cohosting. Also wanted to let you know that I am your newest follower..:)
ReplyDelete-Priyam @ http://priyam-simplejoys.blogspot.com